BaseMeshEffect是用于修改生成的网格的特效类的抽象基类,Outline和Shadow等都是其衍生类或衍生类的衍生类。
BaseMeshEffect 其定义如下:
1 public abstract class BaseMeshEffect : UIBehaviour, IMeshModifier
BaseMeshEffect实现了接口IMeshModifier,所以其内部实现了方法ModifyMesh(VertexHelper verts):
1
2
3
4
5
6
public interface IMeshModifier { [Obsolete("use IMeshModifier.ModifyMesh (VertexHelper verts) instead", false)] void ModifyMesh(Mesh mesh); void ModifyMesh(VertexHelper verts); }
IMeshModifier核心功能是对网格的修改,在Graphic的DoMeshGeneration()中会遍历所有实现了IMeshModifier接口的组件并调用其ModifyMesh(VertexHelper verts)方法,以达到修改网格的目的:
1
2
3
4
5
6
7
8
9
10
11
12
13
14
15
16
17
18
private void DoMeshGeneration() { if (rectTransform != null && rectTransform.rect.width >= 0 && rectTransform.rect.height >= 0) OnPopulateMesh(s_VertexHelper); else s_VertexHelper.Clear(); // clear the vertex helper so invalid graphics dont draw. var components = ListPool<Component>.Get(); GetComponents(typeof(IMeshModifier), components); for (var i = 0; i < components.Count; i++) ((IMeshModifier)components[i]).ModifyMesh(s_VertexHelper); ListPool<Component>.Release(components); s_VertexHelper.FillMesh(workerMesh); canvasRenderer.SetMesh(workerMesh); }
在BaseMeshEffect中,ModifyMesh(VertexHelper verts)是抽象虚方法,因此,继承BaseMeshEffect的类必须覆写ModifyMesh(VertexHelper vh)。以下是UGUI中BaseMeshEffect的各个衍生类及继承关系:
1
2
3
public class PositionAsUV1 : BaseMeshEffect public class Shadow : BaseMeshEffect public class Outline : Shadow
接下来逐个分析这三个类:
PositionAsUV1 PositionAsUV1对于网格的修改在于将顶点坐标存入了UV1中:
1
2
3
4
5
6
7
8
9
10
public override void ModifyMesh(VertexHelper vh) { UIVertex vert = new UIVertex(); for (int i = 0; i < vh.currentVertCount; i++) { vh.PopulateUIVertex(ref vert, i); vert.uv1 = new Vector2(vert.position.x, vert.position.y); vh.SetUIVertex(vert, i); } }
由于接触Unity时间尚短,没有用过此组件,为测试效果这里强行使用一波。为了在Image中使用,需要修改Image的shader如下(注意标注了叹号的行):
1
2
3
4
5
6
7
8
9
10
11
12
13
14
15
16
17
18
19
20
21
22
23
24
25
26
27
28
29
30
31
32
33
34
35
36
37
38
39
40
41
42
43
44
45
46
47
48
49
50
51
52
53
54
55
56
57
58
59
60
61
62
63
64
65
66
67
68
69
70
71
72
73
74
75
76
77
78
79
80
81
82
83
84
85
86
87
88
89
90
91
92
93
94
95
96
97
98
99
100
101
102
103
104
Shader "TestShader/ShaderPosAsUV1" { Properties { [PerRendererData] _MainTex ("Sprite Texture" , 2 D) = "white" {} [PerRendererData] _AlphaTex("Sprite Alpha Texture" , 2 D) = "white" {} _ExtraTex ("Extra Texture" , 2 D) = "white" {} _ExtraTexSize ("Extra Texture Size" , Vector) = (100 ,100 ,0 ,0 ) _Color ("Tint" , Color) = (1 ,1 ,1 ,1 ) _StencilComp ("Stencil Comparison" , Float) = 8 _Stencil ("Stencil ID" , Float) = 0 _StencilOp ("Stencil Operation" , Float) = 0 _StencilWriteMask ("Stencil Write Mask" , Float) = 255 _StencilReadMask ("Stencil Read Mask" , Float) = 255 _ColorMask ("Color Mask" , Float) = 15 } SubShader { Tags { "Queue" ="Transparent" "IgnoreProjector" ="True" "RenderType" ="Transparent" "PreviewType" ="Plane" "CanUseSpriteAtlas" ="True" } Blend SrcAlpha OneMinusSrcAlpha ZWrite Off Stencil { Ref [_Stencil] Comp [_StencilComp] Pass [_StencilOp] ReadMask [_StencilReadMask] WriteMask [_StencilWriteMask] } ColorMask [_ColorMask] Pass { CGPROGRAM #pragma vertex vert #pragma fragment frag #include "UnityCG.cginc" struct appdata_t { float4 vertex : POSITION; float4 color : COLOR; float2 texcoord : TEXCOORD0; float2 texcoord_uv1 : TEXCOORD1; }; struct v2f { float4 vertex : SV_POSITION; fixed4 color : COLOR; half2 texcoord : TEXCOORD0; half2 texcoord_uv1 : TEXCOORD1; }; sampler2D _MainTex; sampler2D _AlphaTex; fixed4 _Color; sampler2D _ExtraTex; fixed4 _ExtraTexSize; v2f vert (appdata_t IN) { v2f OUT; OUT.vertex = UnityObjectToClipPos(IN.vertex); OUT.texcoord = IN.texcoord; OUT.texcoord_uv1 = IN.texcoord_uv1; #ifdef UNITY_HALF_TEXEL_OFFSET OUT.vertex.xy -= (_ScreenParams.zw-1.0 ); #endif OUT.color = IN.color * _Color; return OUT; } fixed4 frag (v2f IN) : SV_Target { IN.texcoord_uv1.x /= _ExtraTexSize.x; IN.texcoord_uv1.y /= _ExtraTexSize.y; fixed4 extraTex = tex2D(_ExtraTex,IN.texcoord_uv1); return extraTex; } ENDCG } } }
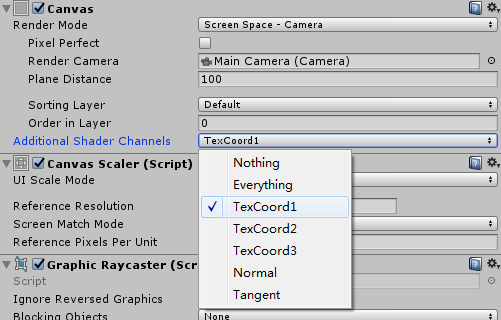
除此之外在Image所在的Canvas需要开启额外的通道TexCoord1 :
Image使用上边的shader,选择一个sprite/UI图片作为_ExtraTex,同时把_ExtraTex纹理的尺寸填到_ExtraTexSize的前两个分量。完成上边的操作之后,拖动Image的pivot,应该可以看到类似下边的效果:
Image的顶点坐标使用的是相对于pivot的值,在shader中以texcoord_uv1获取,通过除以纹理的尺寸_ExtraTexSize,得到位于0~1范围内的纹理坐标,最终绘制在屏幕上。拖动pivot时,Image的顶点坐标会发生变化,也就观察看到了纹理的变化。
Shadow 为组件增加阴影效果:
1
2
3
4
5
6
7
8
9
10
11
12
13
public override void ModifyMesh(VertexHelper vh) { if (!IsActive()) return; var output = ListPool<UIVertex>.Get(); vh.GetUIVertexStream(output); ApplyShadow(output, effectColor, 0, output.Count, effectDistance.x, effectDistance.y); vh.Clear(); vh.AddUIVertexTriangleStream(output); ListPool<UIVertex>.Release(output); }
使用vh.GetUIVertexStream(output)把当前的顶点信息取到一个List<UIVertex>中,接下来修改取出的这个列表,最终使用vh.AddUIVertexTriangleStream(output)保存回去。以下是ApplyShadow对List<UIVertex> output的修改:
1
2
3
4
5
6
7
8
9
10
11
12
13
14
15
16
17
18
19
20
21
22
23
24
25
26
27
28
29
protected void ApplyShadowZeroAlloc(List<UIVertex> verts, Color32 color, int start, int end, float x, float y) { UIVertex vt; var neededCapacity = verts.Count + end - start; if (verts.Capacity < neededCapacity) verts.Capacity = neededCapacity; for (int i = start; i < end; ++i) { vt = verts[i]; verts.Add(vt); Vector3 v = vt.position; v.x += x; v.y += y; vt.position = v; var newColor = color; if (m_UseGraphicAlpha) newColor.a = (byte)((newColor.a * verts[i].color.a) / 255); vt.color = newColor; verts[i] = vt; } } protected void ApplyShadow(List<UIVertex> verts, Color32 color, int start, int end, float x, float y) { ApplyShadowZeroAlloc(verts, color, start, end, x, y); }
按照原顶点的顺序,从前至后,先追加一个相同的顶点,然后修改原顶点的值,以保证shadow绘制在原对象的下边。修改顶点值的之后,根据参数偏移顶点坐标、设置颜色等。
Outline Outline会增加轮廓效果。基于Shadow实现:
1
2
3
4
5
6
7
8
9
10
11
12
13
14
15
16
17
18
19
20
21
22
23
24
25
26
27
28
29
30
31
32
public override void ModifyMesh(VertexHelper vh) { if (!IsActive()) return; var verts = ListPool<UIVertex>.Get(); vh.GetUIVertexStream(verts); var neededCpacity = verts.Count * 5; if (verts.Capacity < neededCpacity) verts.Capacity = neededCpacity; var start = 0; var end = verts.Count; ApplyShadowZeroAlloc(verts, effectColor, start, verts.Count, effectDistance.x, effectDistance.y); start = end; end = verts.Count; ApplyShadowZeroAlloc(verts, effectColor, start, verts.Count, effectDistance.x, -effectDistance.y); start = end; end = verts.Count; ApplyShadowZeroAlloc(verts, effectColor, start, verts.Count, -effectDistance.x, effectDistance.y); start = end; end = verts.Count; ApplyShadowZeroAlloc(verts, effectColor, start, verts.Count, -effectDistance.x, -effectDistance.y); vh.Clear(); vh.AddUIVertexTriangleStream(verts); ListPool<UIVertex>.Release(verts); }
Outline的本质是绘制了四份Shadow,虽然带来了较高的overdraw但是也都是同一批次绘制。
本系列其它文章详见Unity3D UGUI 源码学习
REFERENCE